2015 - 2016 Corvette: Service Bulletin: #16-NA-014: Delayed Engagement After Sitting With Engine Off
Estimated Reading Time: 8 Minutes#16-NA-014: Delayed Engagement After Sitting With Engine Off - (Jun 28, 2016)
| Subject: | Delayed Engagement After Sitting With Engine Off |
|
Brand: |
Model: |
Model Year: |
VIN: |
Engine: |
Transmission: | ||
|---|---|---|---|---|---|---|---|
|
from |
to |
from |
to | ||||
|
Cadillac |
Escalade |
2015 |
2016 |
SOP |
10/08/2015 |
8L90 |
|
|
Escalade ESV |
8L90 |
||||||
|
ATS |
11/23/2015 |
8L45 or 8L90 |
|||||
|
CTS |
8L45 or 8L90 |
||||||
|
Chevrolet |
Camaro |
11/23/2015 |
8L90 |
||||
|
9/28/2015 |
3.6L (LGX) |
8L45 |
|||||
|
11/09/2015 |
2.0L (LTG) |
8L45 |
|||||
|
Corvette |
10/27/2015 |
8L90 |
|||||
|
Silverado |
10/12/2015 |
8L90 |
|||||
|
GMC |
Sierra |
10/12/2015 |
8L90 |
||||
|
Yukon |
10/08/2015 |
8L90 |
|||||
|
Yukon XL |
8L90 |
||||||
|
Involved Region or Country |
North America and N.A. Export Regions |
|
Condition |
Some customers may comment on a condition of delayed engagement when the transmission is shifted from Park to Reverse or Park to Drive after the vehicle has been sitting with the engine off. This condition may typically occur after several hours or more commonly overnight. Customers may describe this condition as:
Operation will be normal for the subsequent engagements throughout the day and the condition will not occur until the vehicle sits again with the engine off for several hours or overnight. |
|
Cause |
This condition may be caused by the torque converter draining the transmission fluid back into the transmission pan. |
- Not Wanting to Move or Slips - Torque Converter Drain Back

If the customer describes the condition as a long engagement with a slip/soft engagement feel and/or the vehicle not wanting to move, the condition should be considered drain back and the following procedure should be followed.
- Using GDS and monitor engine RPM and transmission Input Speed Sensor (ISS) prior to starting the engine.
- Start the engine with the transmission in park.
- ISS should be equal to engine RPM in 3 seconds or less.
- If ISS takes more than 3 seconds to equal engine RPM than follow the procedure for replacing the stator shaft support described in the service procedure below.
- DO NOT replace the stator shaft support on vehicles taking 3 seconds or less for turbine shaft speed to equal engine RPM.
- Delayed Harsh Engagement - Clutch Slow to Fill

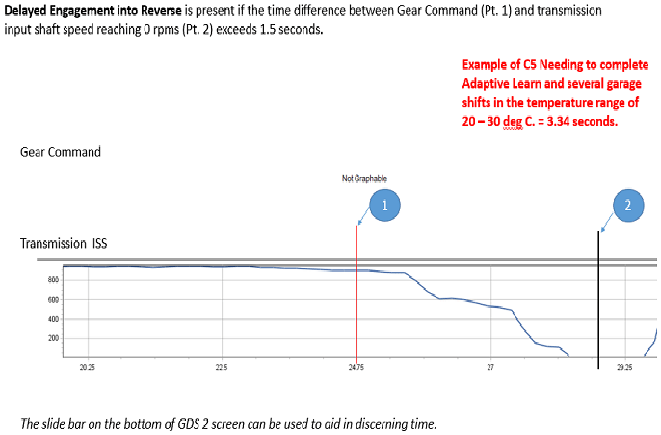
If the customer describes the condition as a long engagement time with a harsh or bump engagement feel when shifting the vehicle from park to drive or reverse. Using GDS and monitor engine RPM and transmission Input Speed Sensor (ISS) prior to starting the engine. Start the engine with the engine in park. ISS should equal engine RPM in 3 seconds or less. If ISS takes more than 3 seconds to equal engine RPM than follow the procedure for replacing the stator shaft support. If the ISS is equal to engine RPM in 3 seconds or less shift the vehicle from park to drive or reverse leaving the service brake applied. ISS should drop to zero “0’ within 2 seconds, this is clutch engagement time. Recording a GDS session log can be useful in diagnosing this condition.
For 2015 MY vehicles Contact GM TAC for review and additional instructions. Prior to contacting TAC record a GDS2 Session log of the delayed engagement.
Note: This procedure will allow the pressures to adapt and improve the engagement time to reverse.
For 2016 MY vehicle attempt to learn the C5 Clutch using the following procedure:
- Allow the transmission sump temperature to rise between 20 and 30 degrees C (68 and 86 degrees F).
Note: Do NOT apply the accelerator pedal.
- Perform 20 Park to Reverse shifts releasing the brake with each shift.
If the learn procedure does not correct the condition contact GM TAC for review and additional instructions. Prior to contacting TAC record a GDS2 Session log of the delayed engagement.
- Allow the transmission sump temperature to rise between 20 and 30 degrees C (68 and 86 degrees F).
- Correction
-
Install a new stator shaft support assembly that includes an additional check ball. Follow the instructions below to replace the stator shaft support assembly.
- Service Procedure
- Remove the transmission from the vehicle and mount to the DT-48989 transmission holding fixture. Refer to Transmission Replacement in SI.
- Remove the 15 bolts (1) securing the fluid pan and gasket to the transmission.

Note: The fluid pan gasket is reusable. Inspect the gasket to determine if it may be reused. If the gasket is stuck to the case or pan, it should be replaced.
- Remove the fluid pan (2) and gasket (3). The fluid filter does not need to be removed.

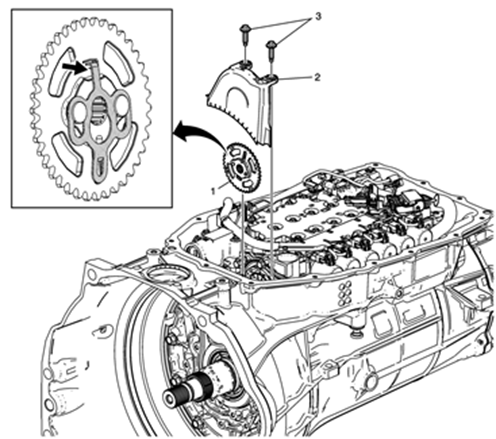
- Using the DT-48285 Torx Plus socket, remove the two fluid baffle bolts (1) and fluid baffle (2). Discard the bolts.
Note: The driven sprocket locking tab is located on the back of the sprocket. Rotate the sprocket as shown and simultaneously pull back and up on the tab to release the retainer.
- Remove the driven sprocket (3) from the oil pump shaft leaving the drive link (chain) loose in the case.

- Remove the 11 front cover bolts (1). Discard the bolts. The bolts have a dry sealant on them and may only be used once.
Note: There are 2 different front cover configurations. Early design front covers have 3 threaded holes for service, late design front covers have 2 threaded holes.
- Use two GE-6125-1B slide hammers and DT-51791 slide hammer adapters in the threaded holes of the front cover to remove it from the case for applications with 3 threaded holes.
- Use the GE-8433 puller bar and 2 bolts in the threaded holes of the front cover to remove it from the case for applications with 2 threaded holes.
- Remove the front cover (2) and seal (3). Inspect the seal and replace if worn or damaged.
- Remove the drive sprocket (5).
- Remove the drive link assembly (6).
- Remove the front support cover gasket (8). Discard the gasket.
- Inspect the front (4) and rear (7) drive sprocket thrust washers. Replace if worn or damaged.

- Remove the turbine shaft O-ring seal (1). Discard the seal.
- Remove the nine stator shaft support bolts (2).
- Remove the stator shaft support assembly (3).


(A) Old stator support asm (B) New stator support asm Note: The new stator shaft support assembly has a second check ball (1) added (see illustrations).

Caution: Size the converter fluid seal ring for at least 5 minutes after installation to obtain proper seal ring size. Failure to do so may cause internal transmission leaks and transmission damage.
Note: Use the large taper side of DT-50912-1 Seal Sizer for initial seal sizing, then flip the tool over for final sizing. The DT-50912-1 seal sizer works for both the 8L90 and 8L45.
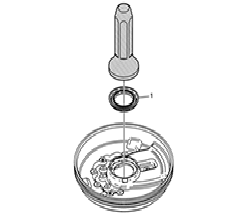
- Using the DT-50912 Seal Installer (8L90) or DT-51196 Seal Installer (8L45), install a NEW torque converter fluid seal (1) on the stator shaft support assembly. Size the seal using the DT-50912-1 Seal Sizer.
- Install 2 NEW 1-3-5-6-7 Clutch Fluid Seal Rings (2).

Note: Align the bolt hole indicated by the arrow with the arrow that is cast into the case and push down to seat.
- Install the NEW stator shaft support assembly (1).
- Install the nine stator shaft support bolts (2). Tighten the bolts in the sequence shown. Tighten the bolts to 31 Y (23 lb ft).
- Install a NEW turbine shaft O-ring seal (3).

(A) Old cover - 8L90 Only (B) New cover - 8L90 Only Note: The casting void has been eliminated from the underside of the cover for the 8L90 only (see illustration). The 8L45 is not required.

- Using the DT-43772 Torque Converter Seal Installer, install a NEW torque converter fluid seal (1) on the front cover.

- Install a NEW front support cover gasket (1).
- Install the (rear) drive sprocket thrust washer (2) on the stator shaft support assembly.
- Install the drive sprocket (3) and drive link assembly (4).
- Install the (front) support cover gasket (5) on the front cover (7).
- Install the front cover seal (6) on the front cover (7).
Note: Ensure the drive link assembly is not pinched by the front cover and moves freely on the drive sprocket.
- Install the front cover (7) on the 8L90 only.
- Install the 11 NEW front cover bolts (8). Gradually tighten the bolts in the sequence shown. Tighten the bolts a first pass to 6.5-Y (58-lb-in). Tighten the bolts a final pass 30 Degrees.
 -
-
Note: Ensure the driven sprocket locking tab is in the unlocked position before installing the sprocket. The driven sprocket locking tab is located on the back of the sprocket and faces the pump.
- Install the drive link (chain) to the driven sprocket (1) and then install the driven sprocket to the oil pump shaft. Rotate the sprocket as shown and push down on the tab until it locks the driven sprocket in place.
- Install the fluid baffle (2).
- Using the DT-48285 Torx Plus socket, secure the baffle using two NEW fluid baffle bolts (3). Tighten the bolts a first pass to 4 Y (35-lb-in). Tighten the bolts a final pass to 45 degrees.

- Install the fluid pan and gasket and secure with 15 bolts. Tighten the bolts to 10 Y (89-lb-in) in the sequence shown.
- Install the transmission into the vehicle. Refer to Transmission Replacement in SI.
- Parts Information
-
Description
Part Number
Qty
Trans Model
Component Number in Disassembled Views
GASKET-A/TRNS FLUID PAN
24260071
1 (if required)
8L45/8L90
48
BOLT/SCREW-A/TRNS FLUID BFL
11548404
2
8L45/8L90
12
BOLT/SCREW-A/TRNS CASE FRT CVR
11548201
11
8L45/8L90
3
SEAL-A/TRNS CASE FRT CVR
24266366
1 (if required)
8L90
5
SEAL-A/TRNS CASE FRT CVR
24251906
1 (if required)
8L45
5
GASKET-A/TRNS FRT SUPT CVR
24272658
1
8L90
19
GASKET-A/TRNS FRT SUPT CVR
24272883
1
8L45
19
WASHER-DRV SPKT THR (FRONT)
24259119
1 (if required)
8L45/8L90
6
WASHER-DRV SPKT THR (REAR)
24259427
1 (if required)
8L45/8L90
8
SEAL-TURB SHF (O RING)
24261849 (Part of 24271697 kit)
1
8L90
500
SEAL-TURB SHF (O RING)
24261848 (Part of 24277071 kit)
1
8L45
500
SUPPORT ASM-STATOR SHF
24277234
1
8L90
14
SUPPORT ASM-STATOR SHF
24277230
1
8L45
14
COVER-A/TRNS CASE FRT
24277964
1 (if required)
8L90
4
SEAL-T/CV FLUID
24259216
1
8L45/8L90
18
RING-1-3-5-6-7 CLU FLUID SEAL
24266593
2
8L90
15
RING-1-3-5-6-7 CLU FLUID SEAL
24266594
2
8L45
15
SEAL ASM-T/CV FLUID
24266709
1
8L45/8L90
2
FLUID, A/TRANS (DEXRON HP ATF) (1 QUART)
19300536-US
19300537-CA
As Required
8L45/8L90
I had this procedure done to my 2015 A8. After a few thousand miles, it is WORSE than it was before...with a few additional problems. It seems the TC locks up in 5th and 6th gear under normal driving, the delayed R-D shift is getting longer and more severe, 1-2 and 2-1 banging into gear in stop and go traffic (sometimes a pretty sever lurch forward like someone hit you from behind), shudders in 4cyl mode, nd overall sloppy shifting in daily driving.