2005 - 2013 Corvette: Service Bulletin: #15643A: Special Coverage - Airbag Light On - (Feb 2, 2017)
#15643A: Special Coverage - Airbag Light On - (Feb 2, 2017)
| Subject: |
15643A — Special Coverage Adjustment – Airbag Light On |
| Models: |
2004 - 2009 Cadillac XLR |
| 2005 - 2013 Chevrolet Corvette |
This bulletin has been revised to add accessory wiring harness part numbers to the Part Information section, update quantities of other parts required, and amend the Service Procedure to install the accessory wiring harness components. Please discard all copies of bulletin 15643.
- Condition
-
On some 2004 - 2009 model year Cadillac XLR and 2005-2013 model year Chevrolet Corvette vehicles, equipped with power seats, the wire harness connector from the seat side airbag and buckle tensioner to the body has a design interference between the vertical adjust crossbar and the carpet. When the seat is moved forward or back, the connector may be dragged along the carpet, pulling terminals loose or pulling the connector apart. This will cause a diagnostic trouble code to be set and the service airbag light will be illuminated.
- Special Coverage Adjustment
-
This special coverage covers the condition described above for a period of 10 years or 120,000 miles (193,000 km), whichever occurs first, from the date the vehicle was originally placed in service, regardless of ownership.
Dealers will replace the affected harness connectors with accessory wiring harness components. The repairs will be made at no charge to the customer.
For vehicles covered by Vehicle Service Contracts, all eligible claims with repair orders on or after April 21, 2016, are covered by this special coverage and must be submitted using the labor operation codes provided with this bulletin. Claims with repair orders prior to April 21, 2016, must be submitted to the Service Contract provider.
- Vehicles Involved
-
All involved vehicles are identified by Vehicle Identification Number on the Applicable Warranties section in GM Global Warranty Management system. Dealership service personnel should always check this site to confirm vehicle involvement prior to beginning any required inspections and/or repairs. It is important to routinely use this tool to verify eligibility because not all similar vehicles may be involved regardless of description or option content.
- Parts Information
-
Parts required to complete this recall are to be obtained from General Motors Customer Care and Aftersales (GMCCA). Please refer to your “involved vehicles listing” before ordering parts. Normal orders should be placed on a DRO = Daily Replenishment Order. In an emergency situation, parts should be ordered on a CSO = Customer Special Order.
|
Part Number
|
Description
|
Quantity/Vehicle
|
|
05297428
|
CLIP, WRG HARN SPLICE (merch pk of 10)
|
8 Per Seat
|
|
12355010
|
TUBING, SHRINK (1/8" BLACK) (merch pk of 10)
|
2 Per Seat
|
|
*1089482 (Preferred)
|
WOVEN POLYESTER ELECTRICAL TAPE (PET)
|
As Required, (Submit as Net Item)
|
|
*90235 (Preferred)
|
YELLOW ELECTRICAL TAPE
|
As Required (Submit as Net Item)
|
|
84120910
|
HARNESS, ACSRY WRG (SEAT SIDE)
|
1 Per Seat
|
|
84120909
|
HARNESS, ACSRY WRG (BODY SIDE)
|
1 Per Seat
|
|
Locally Sourced
|
WIRE TIE
|
6 Per Seat
|
* To obtain the PET and Yellow tape, contact Kent Automotive at 1-888-937-5368 (USA), 1-800-563-1717 (Canada), or www.kent-automotive.com. Dealers that do not have a Kent Automotive account or representative must advise the Customer Service Representative that the part(s) is being used for this GM bulletin to obtain special bulletin pricing. Do not order these two items from GMCCA.
- Service Procedure
-
Customers will be notified of the Special Policy by General Motors (see copy of owner letter included with this bulletin).
Note: There is a diagnostic procedure and a repair procedure in this bulletin.
Diagnostic Procedure
Verify that one or more of the following DTCs are present: B0028, B0029, B0030, B0040, B0041, B0045, B0057, B0058, B0059, B0064, B0065 and B0066
- Use the DTC information to determine what seat(s) require repair.
- If the above listed DTCs are not present, no further action is required. Inform the customer that any additional diagnosis and repairs are not covered under this special coverage.
Repair Procedure
Use the following steps to remove existing yellow seat to vehicle connector pair and install the service connectors using splice clips, solder and heat shrink. The harness in the seat and on the vehicle will then be rerouted from the rear of the seat to the front of the seat.
Warning: When performing service on or near the SIR components or the SIR wiring, the SIR system must be disabled. Failure to observe the correct procedure could cause deployment of the SIR components. Serious injury can occur. Failure to observe the correct procedure could also result in unnecessary SIR system repairs.
- Remove the four seat mounting nuts from the effected seat. Do not remove the seat from the vehicle. Refer to Driver or Passenger Seat Removal and Installation in SI. It is not necessary to disconnect the seatbelt from the seat.
- Move the seat to the center position on the seat track.
- Disable the Supplemental Inflatable Restraints (SIR) system. Refer to SIR Disabling and Enabling in SI.
Caution: Use care to not damage the sill plate or interior trim. Cover the area with a heavy shop cloth, masking tape or similar protective measures.
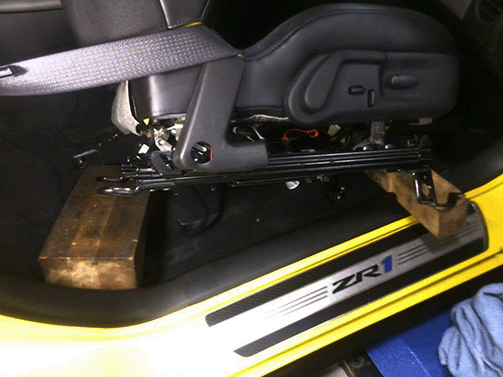
- Using wood blocks or similar material, tilt and support the seat in the vehicle as shown.
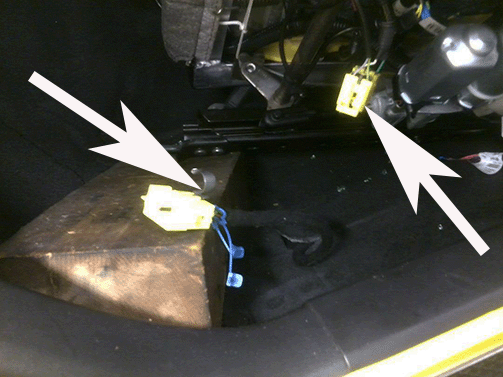
- Locate the yellow harness connector. Disconnect the seat side connector from the vehicle side connector.
Note: Before removing the yellow connector from the seat and body harness, note the wire colors of the seat and body harness. Some wire pairs may be a slightly different color. Some wire pairs may have different colors. Ensure the wires are matched BEFORE splicing the wires of the new connector set. Use the cutoff connector as a wire color template. BEFORE removing the connector from the harness, mark or identify wire pairs of similar color using a pen and tape to ensure the correct wires are spliced together.
- Remove the connector from the seat cross bar by releasing the metal clip.
- Make a list of how the wires relate from the body side harness to the seat harness. It critical that the wire pairs are identified correctly to avoid splicing incorrect wire pairs. THE WIRE COLORS ON THE BODY SIDE HARNESS AND THE SEAT SIDE HARNESS ARE NOT THE SAME.
- Using side cutters, cut the yellow connector off of the seat wiring harness.
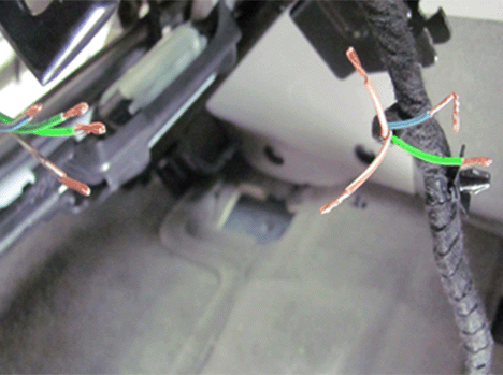
- Strip off approximately 13 mm (1/2 in) of insulation from the wiring ends. Fold the wires.
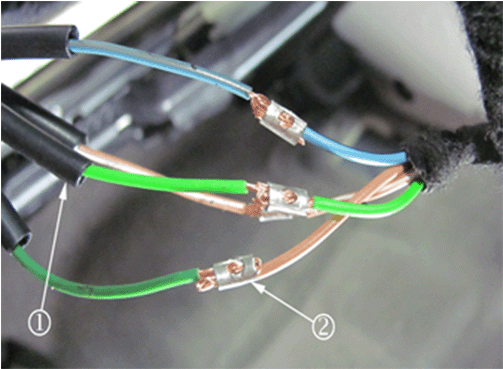
- Add one approximate 38 mm (1.5 in) section of heat shrink tube to each of the four wires (1).
- On the seat side service connector, strip off approximately 13 mm (1/2 in) of insulation from the wiring ends. Fold the wires.
- Join the four wires in the order documented above.
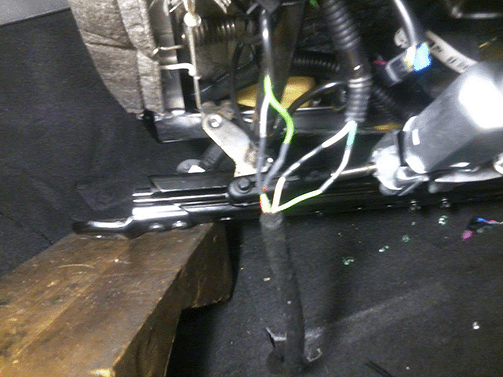
- Crimp a splice clip over the joined wires using Special Tool J-38125-8, nest F. Verify the crimp quality. Repeat this crimp process on all four wire connections (2).
Note: Keep the heat shrink tube below the splice when soldering the splice to ensure that the heat shrink is not prematurely shrunk and closed down over the wire or splice area due to the heat from the soldering iron.
Warning: DO NOT use soldering equipment that is battery or electric powered. These types of soldering irons can induce voltage into the circuit, which may cause inflator module deployment and/or damage to electrical components. Use only the J-38125-5 Ultra Torch or another butane fueled soldering iron when working on SIR circuits.
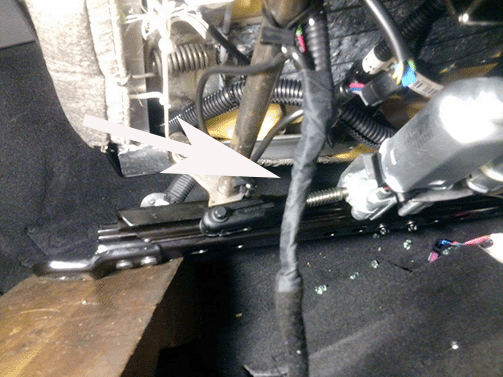
- Solder all four crimp and splice clips using the Ultratorch, part number J-38125-5, or another butane fueled soldering iron.

- Center the heat shrink tube over all four splices and shrink/seal the heat shrink tube securely over the splice crimp and insulated wires.

- Wrap woven polyester electrical tape (PET) or equivalent anti-abrasion tape around the spliced section of seat harness.
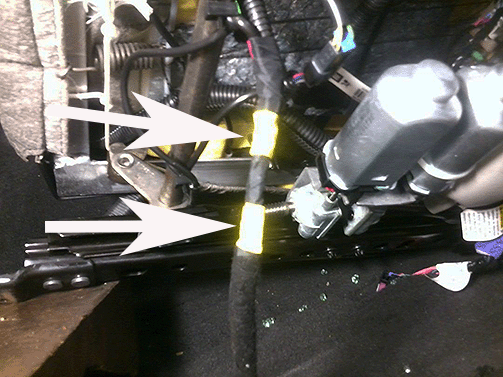
- Wrap a section yellow electrical tape over the polyester electrical tape.
Note: Ensure yellow tape is wrapped around the splice section of the seat wire harness to properly identify supplemental inflatable restraint (SIR) wiring. Failure to properly identify SIR wiring could cause deployment of the SIR components, personal injury, or unnecessary SIR system repairs.
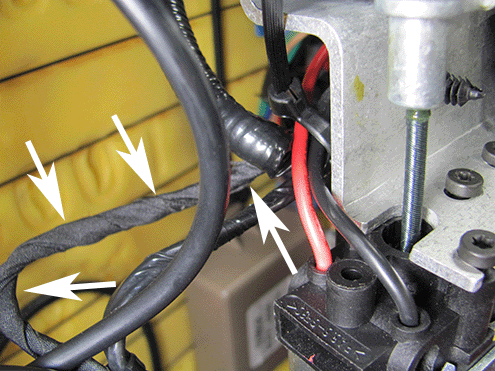
- Route the harness to the front of the seat as shown.
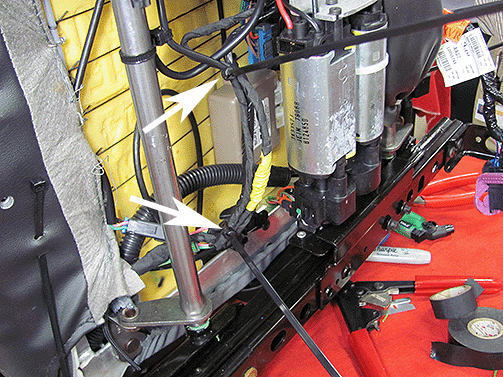
- Secure the harness to the rear of the seat as shown.
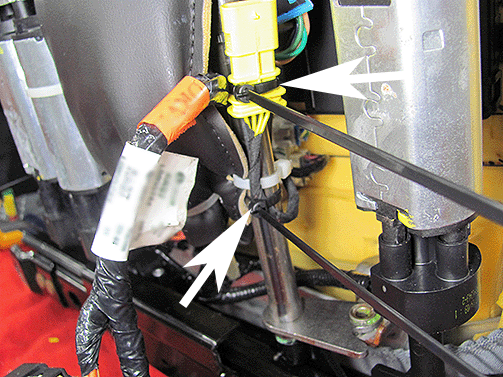
- Secure the wire connector and harness to the FRONT seat cross bar using two cable ties.
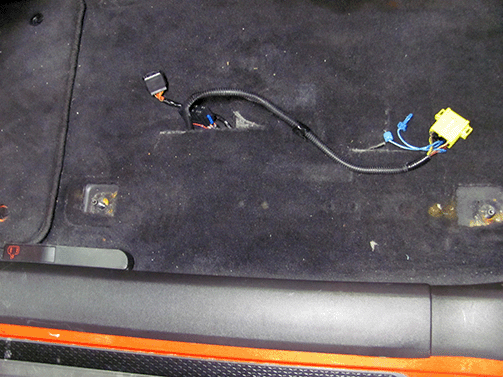
- On the vehicle harness, pull the harness from under the carpet, to the front location as shown.
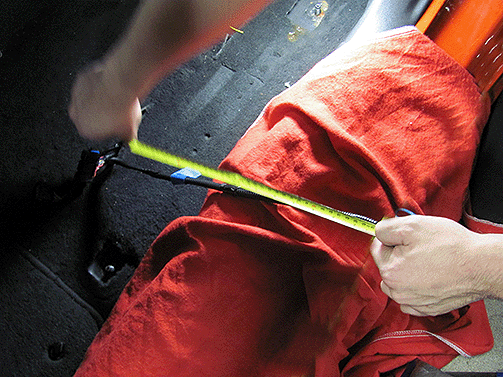
- Measure 300mm (11.8 in) from the connector as shown.
- Cut the four body side wires.
- Strip off approximately 13 mm (1/2 in) of insulation from the wiring ends. Fold the wires.
- Add one approximate 38 mm (1.5 in) section of heat shrink tube to each of the four wires.
- On the service connector, strip off approximately 13 mm (1/2 in) of insulation from the wiring ends. Fold the wires.
- Join the four wires in the order documented above.
- Crimp a splice clip over the joined wires using Special Tool J-38125-8, nest F. Verify the crimp quality. Repeat this crimp process on all four wire connections.
- Solder all four crimp and splice clips using the Ultratorch, part number J-38125-5, or another butane fueled soldering iron.
- Center the heat shrink tube over all four splices and shrink/seal the heat shrink tube securely over the splice crimp and insulated wires.
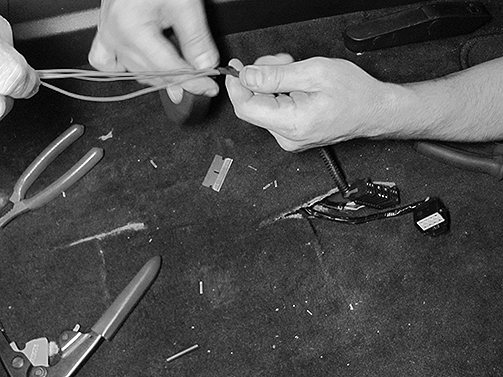
- Wrap woven polyester electrical tape (PET) or equivalent anti-abrasion tape around the spliced section of the harness.
- Wrap a section yellow electrical tape over the polyester electrical tape.
- Reinstall the driver and/or passenger front seats. Refer to Driver or Passenger Seat Removal and Installation in SI.
- Connect the seat connector to the body connector.
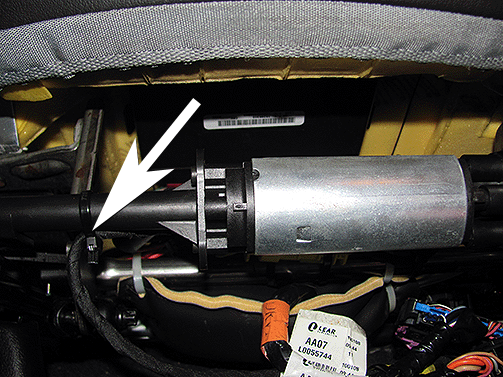
- Using a cable tie, secure the harness to the FRONT seat cross bar.
- Enable the Supplemental Inflatable Restraints (SIR) system. Refer to SIR Disabling and Enabling in SI.
- Clear any sensing and diagnostic module (SDM) DTCs using a scan tool. Verify that the airbag indicator is NOT displayed on the instrument panel cluster (IPC). If DTCs appear after clearing the SDM, refer to the appropriate diagnostic information in SI.
- Customer Reimbursement – For US
-
Customer requests for reimbursement of previously paid repairs to correct the condition described in this bulletin are to be submitted to the dealer by May 31, 2017, unless otherwise specified by state law. If this is not convenient for the customer, the customer may mail the completed Customer Reimbursement Request Form and all required documents to the GM Customer Assistance Center. Repairs must have occurred within the 10 years of the date the vehicle was originally placed in service, or 120,000 miles, whichever occurs first.
All reasonable and customary costs to correct the condition described in this bulletin should be considered for reimbursement. Any questions or concerns should be reviewed with your GM representative prior to processing the request.
When a customer requests reimbursement, they must provide the following:
- A completed Customer Reimbursement Request Form. This form is mailed to the customer or can be obtained through GM GlobalConnect.
- The name and address of the person who paid for the repair.
- Paid receipt confirming the amount of the repair expense, a description of the repair, and the person or entity performing the repair.
Important: GM requires dealers to approve or deny a reimbursement request within 30 days of receipt. If a reimbursement request is approved, the dealer should immediately issue a check to the customer and submit an appropriate warranty transaction for the incurred expense. If a reimbursement request is denied, the dealer MUST provide the customer with a clear and concise explanation, in writing, as to why the request was denied. The bottom portion of the Customer Reimbursement Request Form may be used for this purpose. If the denial was due to missing documents, the customer can resubmit the request when the missing documents are obtained, as long as it is still within the allowed reimbursement period.
Warranty transactions for customer reimbursement of previously paid repairs are to be submitted as required by GM Global Warranty Management. Additional information can also be found in Warranty Administration Bulletin 11-00-89-004.
- Customer Reimbursement – For Canada and Export
-
Customer requests for reimbursement of previously paid repairs to correct the condition described in this bulletin are to be submitted to the dealer prior to or by May 31, 2017. Repairs must have occurred within the 10 years of the date the vehicle was originally placed in service, or 193,000 kilometers, whichever occurs first.
When a customer requests reimbursement, they must provide the following:
— Proof of ownership at time of repair.
— Original paid receipt confirming the amount of unreimbursed repair expense(s) (including Service Contract deductibles), a description of the repair, and the person or entity performing the repair.
All reasonable and customary costs to correct the condition described in this bulletin should be considered for reimbursement. Any questions or concerns should be reviewed with your GM representative prior to processing the request.
- Courtesy Transportation – For US and Canada
-
The General Motors Courtesy Transportation program is intended to minimize customer inconvenience when a vehicle requires a repair that is covered by the New Vehicle Limited Warranties. The availability of courtesy transportation to customers whose vehicles are within the warranty coverage period and involved in a product program is very important in maintaining customer satisfaction. Dealers are to ensure that these customers understand that shuttle service or some other form of courtesy transportation is available and will be provided at no charge. Dealers should refer to the General Motors Service Policies and Procedures Manual for Courtesy Transportation guidelines.
- Warranty Transaction Information
-
Submit a transaction using the table below. All transactions should be submitted as a ZREG transaction type, unless noted otherwise.
|
Vehicles Still Covered Under Applicable New Vehicle Limited Warranties
|
|
Labor Code
|
Description
|
Labor Time
|
Net Item
|
|
6459939
|
Electronics/Airbags - Customer Concern Not Duplicated
|
0.1-0.3
|
N/A
|
|
6480318
|
Driver or Passenger Seat SIAB Connector Replace
ADD: For Second Seat
|
0.7
0.6
|
*
|
Note: For reimbursements on vehicles covered under warranty, refer to the Policies and Procedures Manual.
|
Vehicles No Longer Covered Under Applicable New Vehicle Limited Warranties
|
|
Labor Code
|
Description
|
Labor Time
|
Net Item
|
|
9900321
|
Electronics/Airbags - Customer Concern Not Duplicated
|
0.1-0.3
|
N/A
|
|
9900322
|
Driver or Passenger Seat SIAB Connector Replace
ADD: For Second Seat
|
0.7
0.6
|
*
|
|
9900323
|
Customer Reimbursement Approved
|
0.2
|
**
|
|
9900324
|
Customer Reimbursement Denied - For US dealers only
|
0.1
|
N/A
|
Note: To avoid having to "H" route the customer reimbursement transaction for approval, it must be submitted prior to the repair transaction.
* The amount identified in “Net Item” should represent the actual cost of the woven polyester electrical tape (PET), wire tie and yellow tape needed to perform the required repairs, not to exceed $0.85 USD, $1.18 CAD, plus applicable Mark-Up or Landed Cost (for Export).
** The amount identified in “Net Item” should represent the dollar amount reimbursed to the customer.
- Customer Notification
-
General Motors will notify customers of this special coverage on their vehicles (see copy of typical customer letter included with this bulletin - actual divisional letter may vary slightly).
May 2016
Dear General Motors Customer:
This notice applies to your vehicle, VIN: _____________________________________
As the owner of a 2004-2009 model year Cadillac XLR or 2005-2013 model year Chevrolet Corvette, your satisfaction with our product is very important to us.
This letter is intended to make you aware that some 2004-2009 model year Cadillac XLR and 2005-2013 model year Chevrolet Corvette vehicles, equipped with power seats, may have a condition where, the wire harness connector from the seat side airbag and buckle tensioner to the body has a design interference between the vertical adjust crossbar and the carpet. When the seat is moved forward or back, the connector may be dragged along the carpet, pulling terminals loose or pulling the connector apart. This will cause a diagnostic trouble code to be set and the service airbag light will be illuminated.
Do not take your vehicle to your GM dealer as a result of this letter unless you believe that your vehicle has the condition as described above.
What We Have Done: General Motors is providing owners with additional protection for the condition described above. If this condition occurs on your 2004-2009 model year Cadillac XLR or 2005-2013 model year Chevrolet Corvette within 10 years of the date your vehicle was originally placed in service or 120,000 miles (193,000 km), whichever occurs first, the condition will be repaired for you at no charge. Diagnosis or repair for conditions other than the condition described above is not covered under this special coverage program.
What You Should Do: If you believe that your vehicle has the condition described above, repairs and adjustments qualifying under this special coverage must be performed by a General Motors dealer. You may want to contact your GM dealer to find out how long they will need to have your vehicle so that you may schedule the appointment at a time that is convenient for you. This will also allow your dealer to order parts if they are not already in stock. Keep this letter with your other important glove box literature for future reference.
Reimbursement: If you have paid for repairs for the condition described in this letter, please complete the enclosed reimbursement form and present it to your dealer with all required documents. Working with your dealer will expedite your request, however, if this is not convenient, you may mail the completed reimbursement form and all required documents to Reimbursement Department, PO Box 33170, Detroit, MI 48232-5170. The completed form and required documents must be presented to your dealer or received by the Reimbursement Department by May 31, 2017, unless state law specifies a longer reimbursement period.
If you have any questions or need any assistance, please contact your dealer or the appropriate Customer Assistance Center at the number listed below.
|
Division
|
Number
|
Text Telephones (TTY)
|
|
Cadillac
|
1-866-982-2339
|
1-800-833-2622
|
|
Chevrolet
|
1-800-630-2438
|
1-800-833-2438
|
|
Puerto Rico – English
|
1-800-496-9992
|
|
|
Puerto Rico – Español
|
1-800-496-9993
|
|
|
Virgin Islands
|
1-800-496-9994
|
|
We are sorry for any inconvenience you may experience; however, we have taken this action in the interest of your continued satisfaction with our products.
Terry M. Inch
Executive Director
Global Connected Customer Experience
Enclosure
15643
Article ID: 1328
Created: March 14, 2017
Last Updated: March 14, 2017
Online URL: https://www.corvetteactioncenter.com/tech/knowledgebase/article/2005-2013-corvette-service-bulletin-15643a-special-coverage-airbag-light-on-feb-2-2017-1328.html


