A Dose of Digital: Part 2 - Diagnostic Tool Buyer's Guide - Page 3 of 4
 |
 |
© 2011 by Hib Halverson
No use without permission, All Rights Reserved
![]() Discuss this article
Discuss this article
Battery Health
Low batteries or failing alternators are sometimes forgotten during diagnostic sessions. Some engine controls problems can either be caused or made worse by battery or charging system trouble.
Repetitive deep cycles-running the battery low then recharging it-are the kiss-of-death for batteries in most Vettes. This is a problem for cars which are not driven regularly because their computer memories and some accessories always draw current. Park the car and a month later the battery may be dead. To extend battery life, keep it connected to a low amperage or "trickle" charger.
Best are "smart" chargers which have a microprocessor reading battery voltage. As it approaches the proper level, the charger dials-back the charge rate from 1 or 2 amps to a hundred or so milliamps, just enough to match the key-off current draw. A smart charger betters a conventional trickle charger because it never overcharges. There are several on the market, but we use the Auto Meter "Battery Extender" (PN 9201). I have three, connected to my Vettes and one of them has been in service 12 years. Battery Extenders have added battery life-perhaps as much as 50%-on my cars which get parked for a month or more.
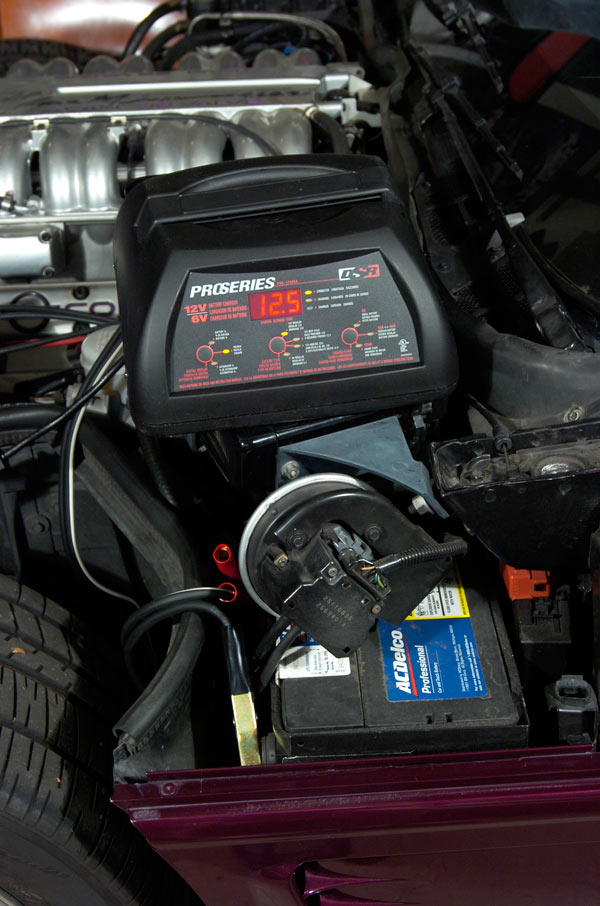
Click image for larger view
The Schumacher will charge regular, deep-cycle, absorbent glass matt (AGM) and gel cell batteries. It's not only a charger but, also, can be a booster to start a car with a low battery. As good as the Schumacher is it could not recharge the Delco in this ZR-1.
Image: Author
Trickle chargers-"smart" or "dumb"-can't charge a dead or significantly-discharged battery. For that, you need a conventional charger of 10A or higher output. Some have test capability and, thus, are as much diagnostic tools as they are maintenance devices.
Based on more than a year testing, we believe the most technologically-advanced, portable battery charger on the market and priced within the upper end of a DIY's budget is the Schumacher Electric "DSR Pro Series" 2/15-40/120 amp unit (PN PSC-12500A). Besides Schumacher's reputation for reliability/durability, another attraction is the PSC12500A, like all Schumacher chargers with the "automatic" feature, works as a smart charger so you can have cake (standard charger) and eat it, too (a smart trickle charger). If you need a regular charger and a smart trickle charger in one device consider the portables in Schumacher Electric's DSR Pro Series.
DMMs discussed earlier can be used to test batteries and alternators, however, the testing can be time consuming and, if the DMM attempt includes trying to load test a battery, it will be inaccurate.
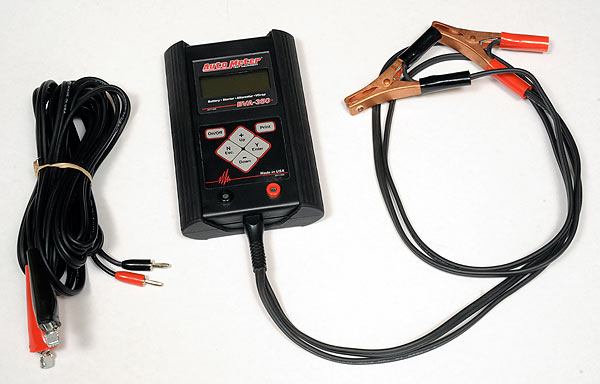
If you want detailed information on battery or charging system condition from quick accurate testing, take a look at the Auto Meter "BVA-300", a hand-held, diagnostic device which performs battery voltage and load, starter draw, automated voltage drop and alternator tests. This device tests batteries with CCA ratings from 200 to 1600. It has digital display and a memory which records the most recent 50 tests.
A BVA-300 can test virtually all batteries you'd find in a Corvette. Connect the device to your battery, key-in the battery's cold cranking amps (CCA) rating, press the test button and battery voltage and condition shows on its display. The unit's main attractions are: accuracy, ease-of-use and compact size.
A more sophisticated sister to the BVA-300 is AutoMeter's BVA-350 which adds an automated voltage drop test function. This test can determine the condition of battery cables and alternator charge wires in the same session a battery load test or alternator test is run.
Some question a DIY using tool costing $280 (BVA-300) or $380 (BVA-350) to test batteries, but if you're like me, with a fleet of cars to maintain (at last count it was eight) the value of these devices is in avoiding battery-related, no-start situations at inopportune times.
Another handy battery-related testing device is OTC's "Parasitic Draw Test Switch" which is sold by Matco Tools (PN OTC7645) and other vendors. It is used with a DMM's amps function to isolate parasitic current draws. It attaches between the negative battery cable and the battery. You connect an DMM to each side of the device then open the switch, allowing current to pass through the meter. Fuses are then removed one at a time until the source of the parasitic draw is located.
Finally-the battery, itself. We had to replace the Delco in the second-generation ZR-1 we used for some of the photos in this article. We tried to charge it with the Schumacher. After it wouldn't take a charge we tested it with the BVA-300 and you saw the results in the image above. We replaced the car's seven-year-old Delco with an Odyssey Battery. If you want the most powerful and durable battery you can get for just about any Corvette, consider the Odyssey by EnerSys. It's reviewed elsewhere on the CAC at: The Solution to my Corvette Battery Problems: The Odyssey Battery.
Grace Under Pressure
Except for '80 California cars and the '81s, all computer-equipped Vettes have electronic fuel injection. With EFI, consistent fuel pressure is more critical than it is for the ancient fuel mixing devices known as "carburetors". Accurate testing of fuel pressure is a key task in engine controls diagnosis work.
All EFI engines use higher fuel pressure than carbureted engines and, after '84, it's as much as ten times higher. With '82s and '84s, nominal fuel pressure is 9-13 psi so you can still connect a gauge with hoses, clamps and fittings. To do this, remove the fuel tube linking the two Rochester 400-series TBIs and replace it with your gage. SPX Kent-Moore, GM's service tool supplier, still sells the Fuel Pressure Gauge Kit (PN J-29658-D) specific to the '82-'84 "Crossfire Injection" system. It's an easy installation-simply remove the pipe between the TBs and put the gauge assembly in its place.
Starting in 1985, Vettes have a pressure test connection on the fuel rail which accepts the female AN-8 fitting on the end of most gauge hoses and has a Schrader valve to prevent leaks if the fitting loosens.
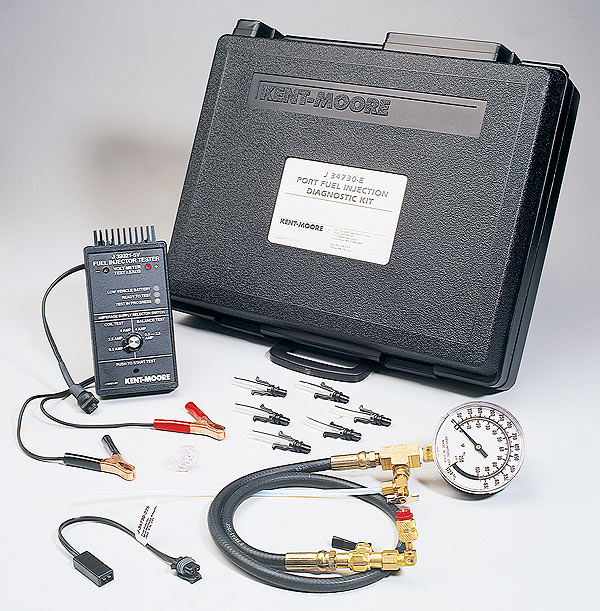
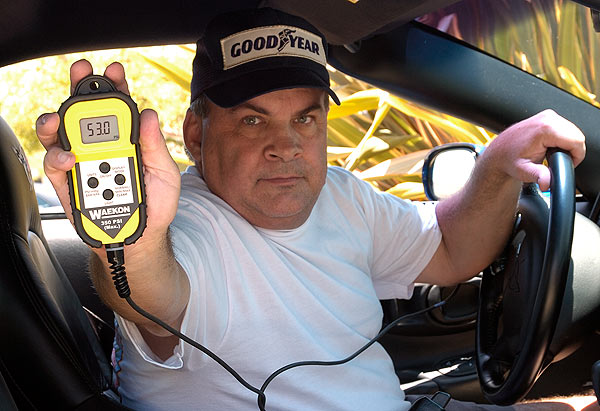
Back in the late-'80s, there weren't many gauge choices so I bought what dealers use, the Kent-Moore "Port Fuel Injection Diagnostic Kit" (PN J-34730-E) which not only includes a gauge but an electronic injector tester, a noid light and some other equipment. Today, there are many choices, from the professional-grade, Kent-Moore tools, to less-costly gauges such as the Actron Fuel Pressure Tester Kit (CP 7818) or Zip Products' Fuel Pressure Gauge (PN PM-104). I still use my Kent-Moore Diagnostic kit-it's like an old friend in my tool box, but Waekon has me thinking about changing with its "Universal Digital Pressure Gauge with Remote Readout" (PN 48165). Introduced in 2007, the "UDPGwRR", is great if you need pressure data during road test or on a chassis dyno and the gauge is going to be viewed away from the engine.
The Waekon reads pressures from -30 inHg to 350 PSI with +/-1% accuracy. It can measure fuel, oil or automatic transmission line pressure. There is no need to convert measurements because it can display in PSI, KPA, inHg or BAR. It has no mechanical parts to go out of calibration. It comes with fuel pressure test adapters and accepts other popular pressure test kit adapters. With its die-cast aluminum case and rubber boot, the Universal Digital Pressure Gauge with Remote Readout is more robust than analog gauges. Its large, back-lit display offers good readability in low lighting or sunlight.
The "UDPGwRR" has a 10-foot cord which enables the readout to be inside the vehicle while fluids stay at the test point where the transducer is located. The Readout has a "Min/Max" feature allowing capture of pressure drop-outs during road testing. It's accuracy and quick response provides fast repeatable results during injector pressure drop tests. The Waekon has a pressure relief valve and a short length of hose with which to vent fuel into a can. The relief valve assembly has quick a release fitting to connect to the adapter which screws onto the fuel rail. A second quick release fitting is between the relief valve and the transducer.
In the past, if I needed fuel-pressure during road tests, I routed the my Kent-Moore's hose such that it exited the engine compartment with the hood down then taped the gauge to the windshield. The Waekon UDPG avoids all that work. Simply route the 10-foot cable into the car, close the hood on the cable, put the display on the passenger seat-pretty slick design, I'd say.
The Hot and Cold of It
Click image for larger view
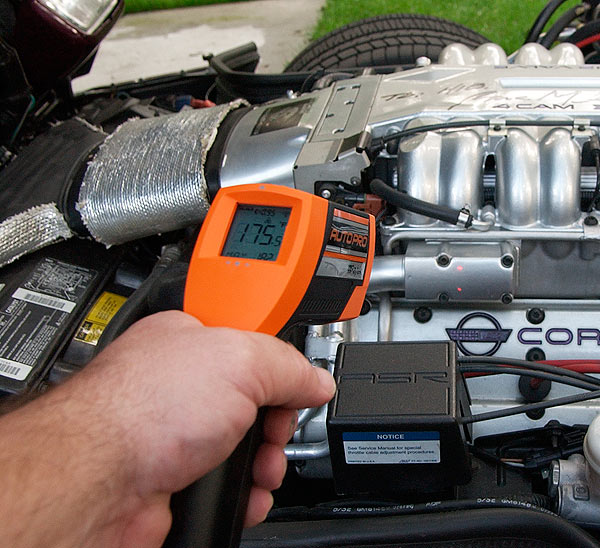
The Raytek Autopro measuring coolant temperature at the left water outlet on this LT5 engine. While Autopro costs more than the MiniTemp, we think it's a better choice for Corvette work with its wider range (-25°F to 999°F), increased accuracy and other features.
Image: Author
Temperature measuring devices we've covered so far require touching a probe to the object being measured. Sometimes that's easy-other times it's too darn hot. Infrared (IR) thermometry measures an object's temperature without the measuring device touching it. This allows quick, safe, temperature measurement of objects which are moving, extremely hot or difficult to reach.
The Raytek brand (now owned by the Fluke people) began marketing "noncontact" infrared thermometers for automotive use in the mid-'90s. A Raytek is elegant in its simplicity. Pull the trigger, put the laser point on the object then read temperature on its display. Have an engine with a misfire? Read each exhaust port. If one is a lot cooler, there's your misfiring cylinder. Got an exhasut port that's a little hotter than the others? That cylinder might be lean. You can determine if a catalytic converter is working by measuring inlet and outlet temperatures. Have a Vette that doesn't cool well but the cooling system seems to check-out ok? With the engine running, aim the Raytek at different areas of the radiator. A partial blockage will be cooler than surrounding tubes. If the gauge shows hot but the engine isn't overheating. Measure the water outlet or the temperature sensor to verify gauge accuracy.
The Raytek Autopro ST25 has a dual-beam laser sight (easier aiming in an automotive environment) a white LED (to illuminate the measuring area) bright orange trim (easy to find on a messy work bench) and a removable magnet on the handle (stick it on the side of your tool box). Those features, with Raytek's accuracy and quality has made the Autopro my favorite.
The Raytek MiniTemp is a smaller, less expensive and slightly less-capable IR Thermometer. It only can measure up to 500°F so it may not work on cats and some other exhaust parts, but it has a laser sight and costs less than a hundred bucks.
 |
 |

